Nails & Needles

Of knitting and nail polish

Isadora Jewels of the Orient (Fall 2012)

When Isadora first annouced its fall collection for 2012, I had a feeling I’d be all over it. I was right!

Initially, I thought I’d end up getting them all, but once I saw them in person, there were some I didn’t particularly fancy, so I skipped those. I got six of them: Beetle Green, Black Amethyst, Ancient Ruby, Oasis, Silk Road and Peacock.

I’m late showing them off, I know, I know. That’s what happens when there’s no internet connection to be had. These have been photographed and ready to go up since early November, but I haven’t had the time or inclination to post until now. Oh well.

Speaking of time and inclination: I was kind of lazy when I swatched these as well. For most of the colours, I only did one nail, so I could get four in one go. Bad, nail blogger, bad.

IMG_2239

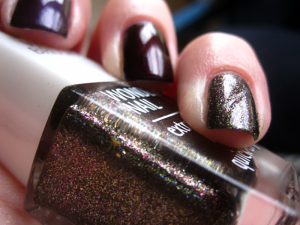
Beetle Green (index finger) first made its appearance for fall 2011, but since I wasn’t into nail polish back then the way I am now, I missed it at that point. After drooling over pictures of it online, I was over the moon to see it back in this year’s fall collection. It’s a gorgeous blackened green metallic, quite reminiscent of a beetle (so good name choice, Isadora!). Two coats gives full cover.

IMG_2245

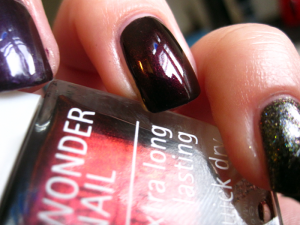
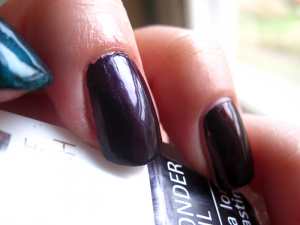
Black Amethyst (middle finger) is a deep blackened purple with a very fine silver shimmer suspended in the base. Again, two coats are enough for complete cover. If you’re careful (which I’m not, usually), you might even get away with just one coat of this.

IMG_2249

Ancient Ruby (ring finger) is a deep, deep blackened and shimmery red. Quite by coincidence, I discovered that it’s, if not a perfect dupe, then at least very similar OPI’s Every Month is Oktoberfest. Killed that lemming for me! One coat could be enough for this polish, but I like a second coat to really deepen the colour and make it look like my nails are glowing from within.

IMG_2255

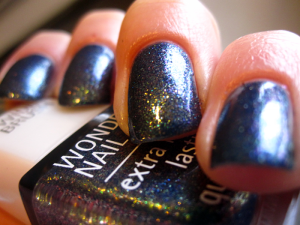
Oasis (pinkie) reminds me a lot of H&M’s 0516 Black. Both are dark grey jellies with gold and blue microglitter. The biggest difference is that the blue glitters in Oasis seem to be duochrome and look purple from certain angles. The base colour also appears to be slightly darker at three coats, which is what you need for full cover. (And if you let it dry properly before trying to do things with your hands, you don’t get unsightly marks ruining your polish. ::cough::)

IMG_2265


IMG_2262

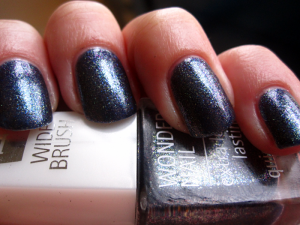
My favourite in this collection is Silk Road, which is a blue/purple duochromatic glitterbomb. So gorgeous! I really wish photos did this one justice, because oh my! In the bottle, it doesn’t look all that special at first, but then when you get it on your nails — oh dear! First time I wore it, I went around showing it to anyone who’d look for just a second.

As the base is a jelly, this does require three thin coats to fully cover any VNL, and you have to wait a little while between coats unless you want cuticle drag. Those minor inconveniences aside, this is such a stellar polish! I think it could possibly be a dupe for OPI’s On Her Majesty’s Secret Service, or at least it’s very similar.
Blue Monday: Color Club Take Me to Your Chateau

 Another Monday, another blue polish for Mrs Data.

Last week, I had a few nail accidents and not even my tea bags could save them, so I ended up filing them all down. Major sadface at that, for real.

I probably shouldn’t show my nails here until they’ve grown out a bit more, but, well, I have too many polishes to resist anyway. Okay, so my nails are ubershort. I can still paint them, and I still will. If it’s not your cuppa tea, that’s cool, I understand. We can’t all like the same things!

All that aside, this week I decided to go for another nail art-y manicure. I bought a new nail marker recently and I wanted to see if it was worth it. It worked super well for the first, oh, three minutes, but then it started being a pain in the arse. Poop. I didn’t give up, though, so my nails are sporting quite a lot of polka dots today. As much as I love polka dots, my favourite thing about this mani is actually the angry little reptilian dude on my left thumb nail. How cute is he?

As for the blue this Blue Monday, it’s called Take Me to Your Chateau (long unwieldy name, hello!) and a Color Club polish. Baby blue creme that covers in two coats (on most nails. Some needed three). For such a pastelly colour, the coverage is actually pretty fantastic. Usually, this kind of blue is so not My Thing, but for this one I’m willing to make an exception. I love it! And I actually don’t think it looks half bad on my little stubbies.

Blue Monday: Color Club Blue-topia

It’s Monday and you all know what that means: Blue Monday!

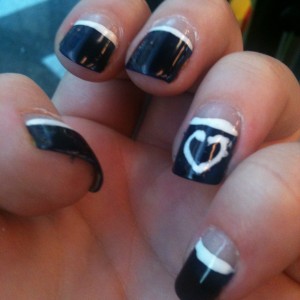
Today I’m sporting a ridiculously rushed half-moon nail art thing. Seriously. I was in a hurry to go to work and my nails were completely bare, but I was going to do something, or else. And then I remembered it was Monday, so I couldn’t reach for the closest polish (which was a kind of snot green colour. Sounds yucky, but I love it! You’ll see that too soon enough), which meant even less time to finish it. Oh dear.

Anyway. I applied three coats of Color Club’s Blue-topia (a lovely deep blue jelly) to about two-thirds of my nails, then one layer Seche Vite, then Broadway Nails’ white nail art polish for the accents (and the wibbly wobbly heart!), then another coat Seche Vite. Done! I’ll probably recreate it some other time when I’m not so stressed, but meh. For today, it’ll do.

Blue-topia is lovely! It does end up a little uneven even after three coats, but so much that I’m really bothered by it, and the colour is gorgeous. The formula is quite thin and the polish likes to pool in the brush handle, so I ended up with stained hands, but the colour makes it worth it. Time and time again!

Nail and Hand Care: Nails

Every nail enthusiast has their own tips and tricks for keeping their nails and hands in tip top condition. In this series of posts, I thought I’d show you what works for me. Some of these I’ve discovered through other people’s blogs, some I’ve found on my own.

There’s been a bit of trial and error before I got far enough to say with certainty that this thing or that thing is beneficial to my nails and/or my skin. Some of the items below are actually still in that testing stage, but things are looking good for them, so they’re included anyway.

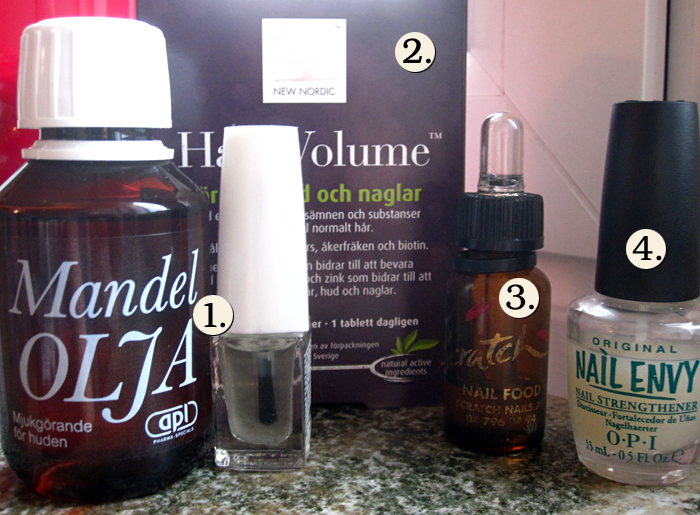
  1. Mandelolja APL (almond oil). Small-moleculed oils are perfect for your nails (and not bad for your skin either!). The small molecules means that the nail can absorb them properly, which means they become more supple and springy and won’t break so easily. (Think dry wood vs fresh branches that still contain moisture. You can thank Viola for that comparison!) The bottle is a little clumsy, so I used an empty nail polish bottle and poured some oil over into it. Bonus points for the brush in the lid thus making it easier to apply! Especially when I’m wearing nail polish, I like being able to get under the nail edge, so the brush helps.
  2. Hair Volume. I’ve only been using these for about two weeks thus far, so can’t really tell if they make a difference or not. It’s a dietary supplement and “is based on vitamins, minerals and innovative hair growth factors from apples.” B Vitamins, silica and zinc are supposed to be good for both hair and nails, so can’t hurt, right? It’s one tablet a day and each pack lasts 30 days. Quite pricey, though (even with my employee discount at work), so I’m not sure if I’m going to keep using it all the time, or just do a 30-day treatment every now and then.
  3. Scratch Nail Food. This one lives in my mini nail kit. It’s the first nail oil I started using, and my favourite. It contains mainly sesame seed oil, which is another small-moleculed one, but also myrrh and lavender. Unfortunately, this is really expensive, so I’m not sure if I can justify buying a new bottle when this runs out. The only real difference to my almond oil is the scent, which is quite nice, so I’m thinking I’ll fill up the bottle with almond oil once there’s just a little bit left. That way, I should still get some of the scent with the new “batch.” I try to use this or the almond oil at least twice a day, sometimes even three times, to make sure my nails don’t get brittle and break.
  4. OPI Original Nail Envy. I’ve been using this nail strengthener for about six months now. It was the first product I bought to try and strengthen my nails. At first it worked nicely, though my nails would still split, so then I switched to nail oils for a while instead. However, using only those, I still wasn’t able to grow my nails out like I wanted to. In the end, about six weeks ago, I started using both the nail oils and the Nail Envy at the same time. Finally, I saw results I really liked. Long, strong, non-splitty nails. Brilliance! What I do is, I start by massaging in some nail oil and waiting a little while to let it really absord. Then, I apply two coats of Nail Envy and let that dry before starting with my base coat &c.

  1. ACO Sense & Care Nail Polish Remover. My favourite nail polish remover ever! And I can buy it at work! See, I’ve tried a few other removers, but all of them leave this yucky, oily film that I absolutely cannot stand. This one doesn’t! Plus, it’s the best of the ones I’ve tried at the actual removal of nail polish too. Double win!
  2. Medical compresses (non-sterile). Another thing I buy from work. They come in different sizes and I use them for both nail polish removal and when cleaning off my make up. They’re super soft and don’t leave fuzz behind.
  3. NailTek Foundation II. Another thing I first heard about on nail blogs. I buy it off eBay. It’s my favourite base coat so far and the first one that actually makes my nail polish stay on. My current bottle is almost all out, though, so I need to buy a new one. I’m going to wait until I’ve properly tried out #4 in this picture, though.
  4. Seche Base. Another base coat. Reminds me a bit of NailTek, but it dries shiny with a bit of shimmer (as opposed to matte like the NailTek). When it dries, that is. With some polishes, it seems like this never properly dries, so I’m not quite friends with it yet. When I have managed to get it to work, though, I’ve been very impressed, so I’m going to give it some more chances to prove itself.
  5. Seche Vite. This is pretty much everyone’s favourite quick-drying top coat, and for good reason! It dries super fast and gives massive shine. For a while, I didn’t quite get along with this, but then I learnt the trick of “tucking” your nail polish under your nail and then doing the same with this. Once you know to do that, this top coat is hard to beat! The biggest beef I have with it now is that it does tend to chip, especially in conjunction with some polishes.
  6. Essie No Chip Ahead. This is my most recent acquisition and I bought it to see if it would help with the chipping issue I sometimes have with Seche Vite. I’ve had mixed results so far, but then one of those times, it was with a Butter London polish, and those don’t get along with Seche stuff to begin with. But yes, still a trial run with this one.

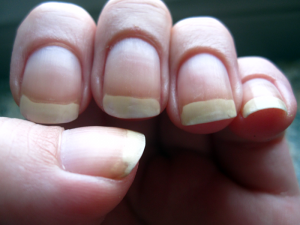
And this is what my naked nails look like now! Slightly discoloured, I know, but a lot better than they used to!

Cactus’ Nail Polish Magnesium

My first indie! And it’s probably so indie you’ve never even heard of it. =P

Cactus’ Nail Polish is a blog I follow and a while back she made her first nail polish collection. The day they went on sale, I was away from home so I was convinced I’d miss out completely. As luck would have it, though, my favourite shade was, for some reason, the least popular one.

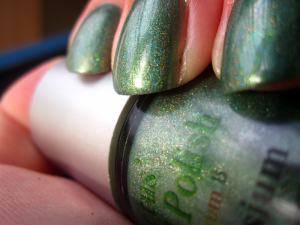
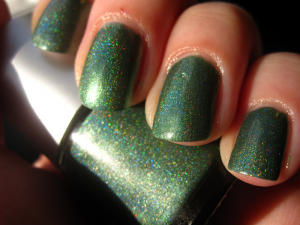
Magnesium is a green linear holo and I adore it. The formula is quite thick, but since the polish is very richly pigmented, one coat is enough for full cover and the thickness is not a big deal at all. It dries kind of matte on its own, so yes, I did use top coat on it. Oops?

Just as luck was on my side when I got my hands on this, it was when I went to swatch it too. The sun came out! For the first time in aaaaages — I’d almost forgotten what the sun looked like!

Cactus’ Nail Polish is apparently working on a new collection now, and I’m really looking forward to seeing what it brings!

Isadora Forest

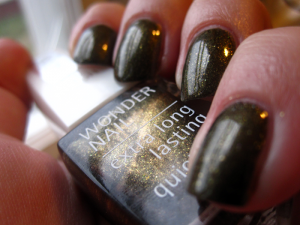
Forest is from Isadora’s Fall 2011 collection. It, for some reason, stuck around in the permanent selection for quite a while, but now seems to have disappeared again (I was super stoked to find two bottles in a store the other day, as I’d not seen it for months and I have promised to get it for two friends, so was getting a little worried there).

This is a gorgeous forest green colour full of bronze shimmer. It kind of reminds me of Make Up Store’s Merit, in the way that they both make my nails seem like they’re glowing from within, but Forest is definitely green. Forest is really such a fitting name for it!

Isadora Polar Nights

I missed last week, but now I’m back on form for Blue Monday!

For Isadora’s Holiday 2012 collection, they have released three new nail polishes. One is a gold glitter, one is a silver glitter and one is a deep blue jelly loaded with silver and blue microglitter and larger hexes. I’m betting you can guess which one I decided to pick up?

Polar Nights is the aforementioned deep blue jelly. As a jelly, it does require three coats to cover completely (though three coats is not bad as jellies go!), but because of the glitters, this adds depth to the hexes, especially. It’s like a jelly sandwich without all the work.

Like most of Isadora’s polishes, this dries super shiny even without a top coat (though in the photos I am wearing a coat of Seche Vite on top).

I have to say, this is one of my favourite blue polishes and I’m so glad I got my hands on it (this was the last bottle left in the store!).

Nail and Hand Care: Cuticles and Hands

Every nail enthusiast has their own tips and tricks for keeping their nails and hands in tip top condition. In this series of posts, I thought I’d show you what works for me. Some of these I’ve discovered through other people’s blogs, some I’ve found on my own.

There’s been a bit of trial and error before I got far enough to say with certainty that this thing or that thing is beneficial to my nails and/or my skin. Some of the items below are actually still in that testing stage, but things are looking good for them, so they’re included anyway.

  1. Plastic orange stick. For pushing back my cuticles after using cuticle cream or for use during nail-mending.
  2. Oliva Eco Cuticle Oil. For keeping my cuticles soft. I try to use this at least once a day, but sometimes I forget. I like this particular one because it has a brush applicator, but I sometimes also use ACO Sense & Care Cuticle Cream.
  3. Glass nail file. I need to get a new one as I broke this one just the other day. It still works great, it’s just a bit fiddly. On the plus side, this is now small enough for me to keep a piece in mymini nail kit. ;) Glass files are brilliant because you don’t have to worry about which direction you file your nails and, also, unless you break them (like I do! I’m clumsy as all that), they last forever and a day.
  4. Foldable nail file/buffer/polisher. I don’t like this one as much as my glass file, but it works well enough in a pinch. The buffer and polish sections of this work a lot better than the file bits, so I tend to use those most. Sometimes I use the buffer right after I’ve applied nail oil (which I will talk about in the next post in this series).
  5. Nail brush. I use this after my cuticle eraser has worked its magic. It helps to get rid of those pesky dead skin cells and stuff that likes to sit around your cuticles. This came in the little mesh bag I keep my mini nail kit in.
  6. CND Cuticle Eraser. Great for getting rid of those dead skin cells I mentioned above. I got this off eBay after reading about it on a couple of blogs, but I wasn’t sold at first. Eventually I realised that it was because I didn’t let it sit on my cuticles long enough before rubbing it off. Now what I do is: apply it on each of my cuticles, let it sit for about 15 minutes before rubbing it in (much like you would a cuticle cream or oil), then take my nail brush and brush it over my cuticles to make sure all the stuff the eraser has softened up actually rubs off. Then I wash my hands to get rid of the last traces.
  7. Cowshed Cow Pat. I received this in September’s Glossy Box and I’ve used it ever since. It contains grapefruit and coriander oil, which means it smells really special. I love coriander, so I love the smell, and this makes my hands feel really soft and smooth. I’m almost out of my tube and first chance I get, I’m buying a full-size one. Can’t be without it now!
  8. LUSH Lemony Flutter Cuticle Butter. Name one nail blogger who hasn’t mentioned this at some point? I bought it after recommendations from a lot of people and while I’m not the biggest fan, I do like to use it sometimes when I feel my cuticles need a little extra moisture action (like when I’ve been neglecting them). My favourite use, however, is for when I’m swatching a lot in one go: I rub this on my nails, then apply a coat of Seche Vite to them. After that, I apply my nail polish and finally another coat of Seche Vite. When everything has dried properly, it’s super easy to just peel off in one go. Best trick ever! I learnt it from Cactus’ Nail Polish.

That’s it for today! Now you know my favourite products for keeping my hands looking nice and feeling soft, as well as for shaping my nails. What are yours?

Make Up Store Charmaine (Shimmer 101)

First of all, can I just say how much I love the brushes on Make Up Store polishes! I think these may actually be my favourite brushes ever! They are very easy to work with and make the polish very controllable. Me likey.

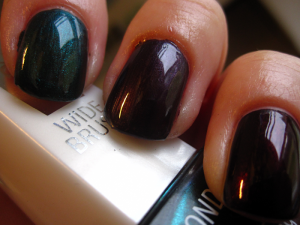
Charmaine is a beautiful teal polish, shockful of holographic particles. It’s not a linear holo, but the holo effect is definitely there, which is quite odd. I mean, MUS have polishes that are clearly marked as holos, and this is not one of them.

Either way, this is so pretty, and it’s a one-coater! Gotta love a good one-coater! And this one is good. Very good. Very, very good.

If you’re going to buy only one or two MUS polishes, I’d say to go for this and/or Merit. No doubt about it.

Not going to stop scratching my head over the supposed non-holoness of this, mind.

Make Up Store Merit (Sparkling 001)

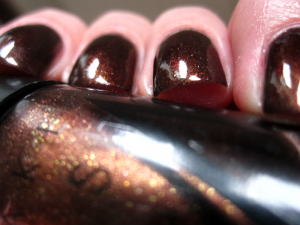
Merit was the first Make Up Store polish I ever bought and well worth every penny I spent on it. It’s been one of my favourites all autumn and probably will be even after winter comes.

The base colour is a rich warm chocolate with copper shimmer and microglitter. Two coats (one thin, followed by a more generous one) are enough to give full opaqueness and make your nails look like they’re glowing from within.

Every time I’ve worn this to work, I’ve had customers asking me where I bought it and exclaiming that they have to get it. Can’t say I don’t understand them! I would crave this too if I didn’t already own it.

Post Navigation